Saturday, November 14, 2020

25 Days of Christmas tags 2020 - Day14


Hello, and welcome! Today is day 14 of the10th annual 25 days of Christmas tags event hosted by the lovely Tracey McNeely.  I look forward to this every year. As you can see, my blog exists for the sole purpose of participating in this event. πŸ˜‚ 


Head on over HERE to find out all the details of how you can participate and win some of the amazing prizes that are up for grabs. 


Todays sponsor are the masters of cuteness, the ever popular... LAWN FAWN, so consider yourself warned. πŸ˜‰


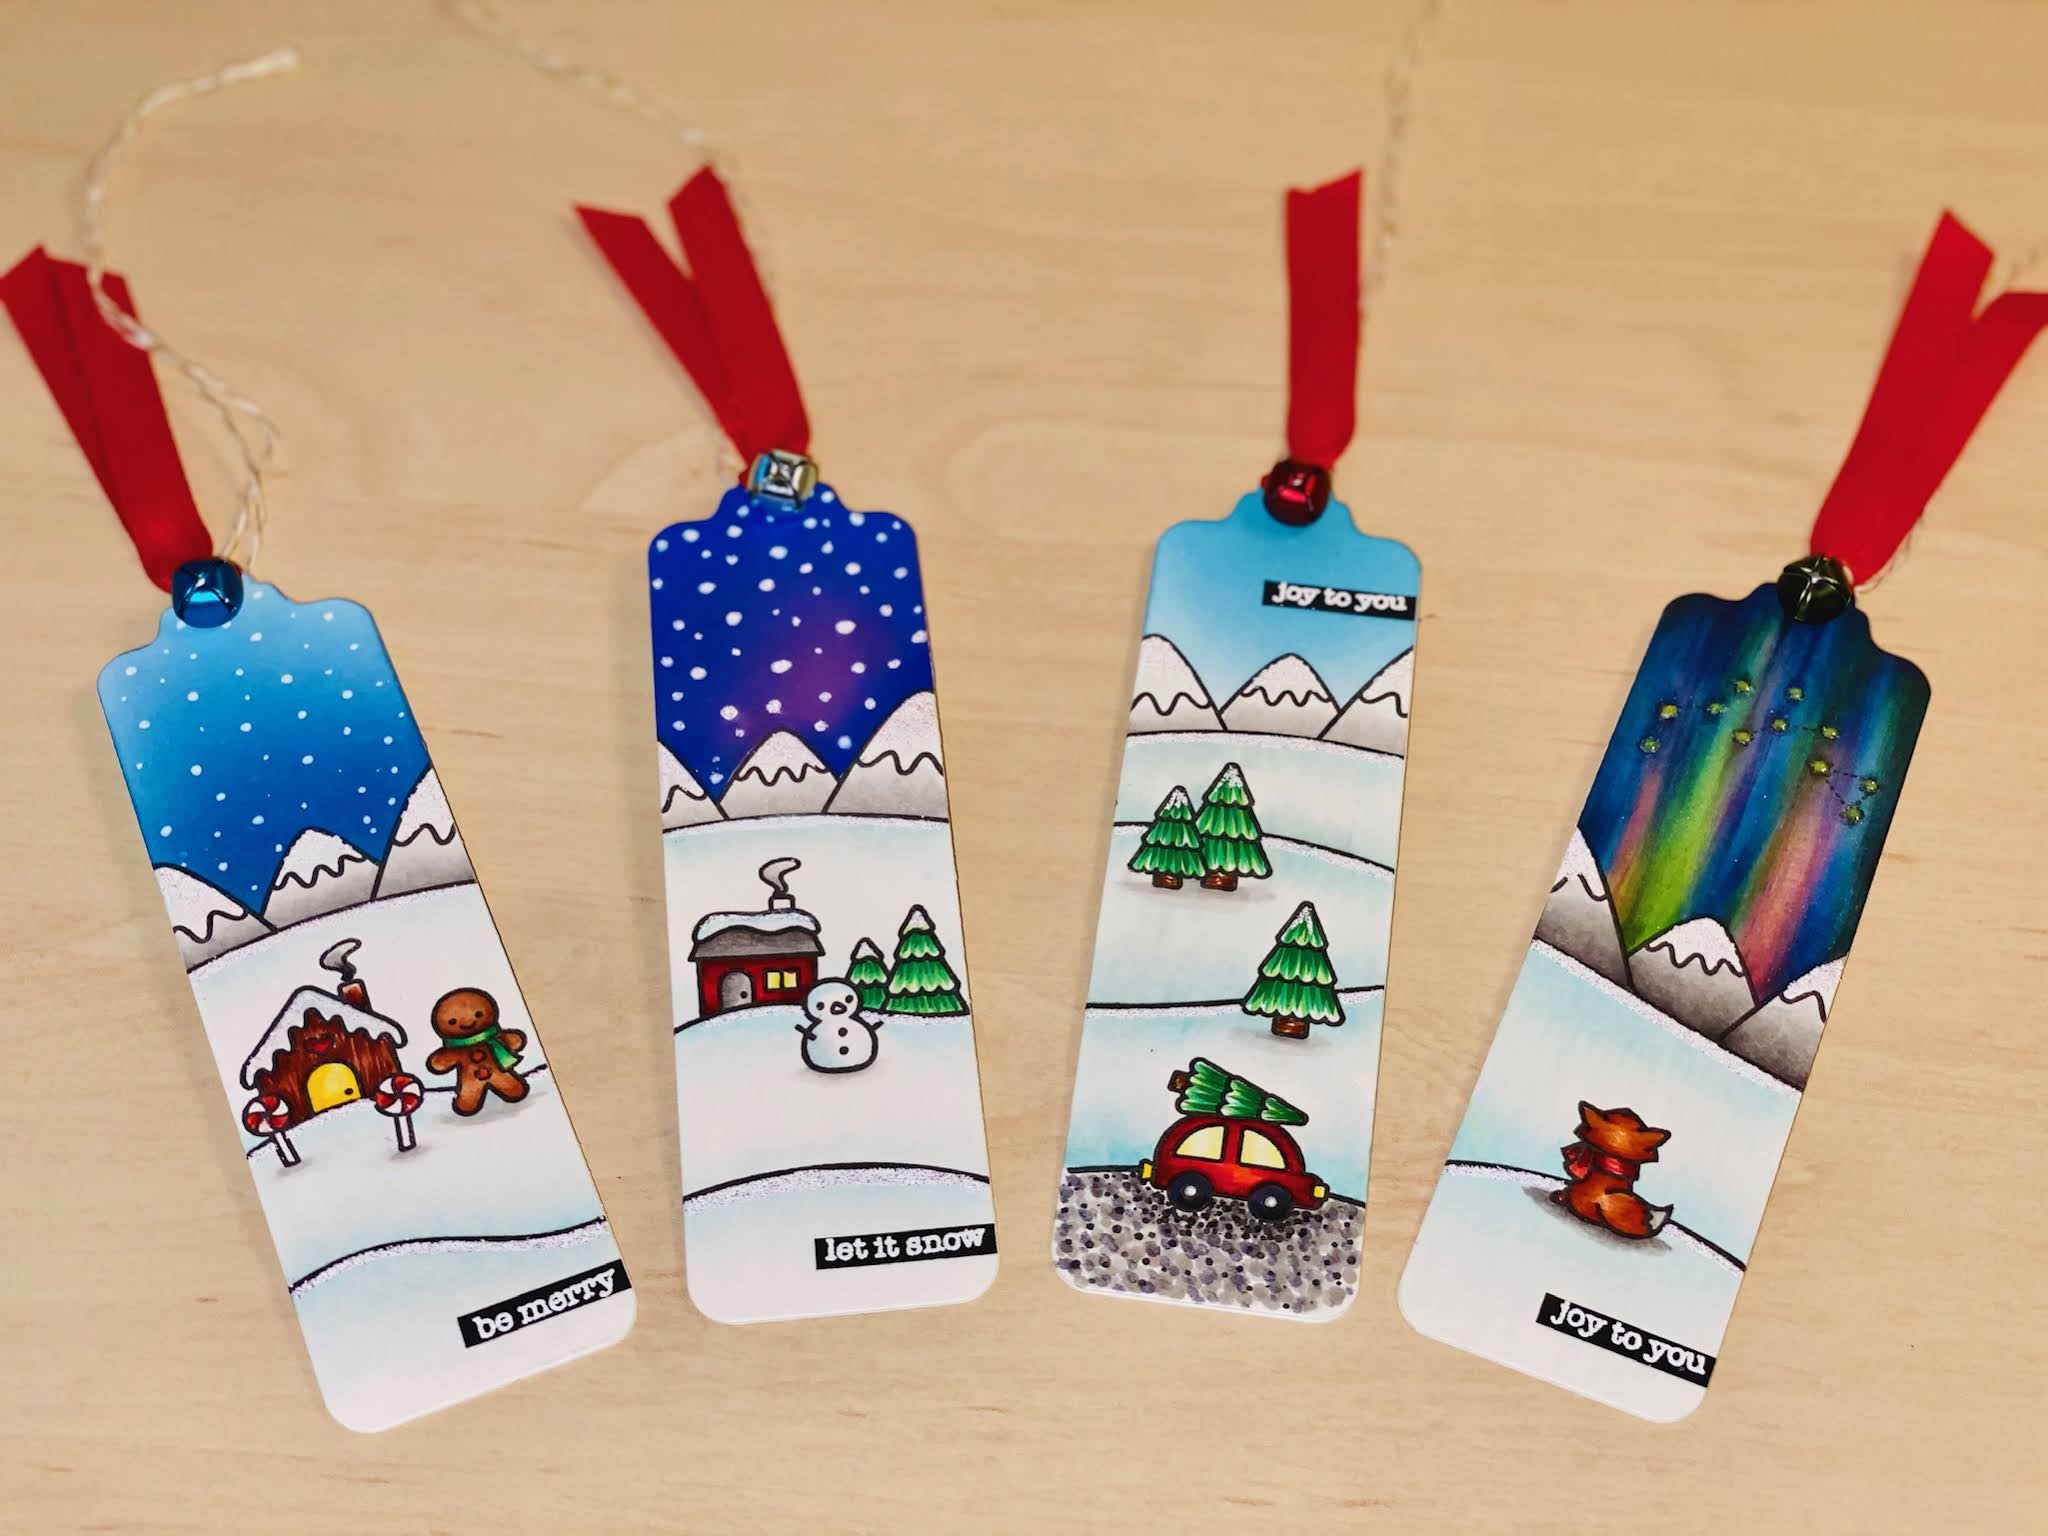
While brainstorming some ideas for todays tags I came across a bookmark die and it reminded me of a miniature version of the current slimline cards that everyone is making. It then occurred to me that books are usually very popular Christmas gifts and that's when it hit me... Bookmark tags! The icing on top is that it is environmentally friendly too. Instead of it getting tossed out it can be used for years to come. That's a win in my book. (see what I did there?πŸ˜‰)

Anyhow... moving on to the tags. I used the ~Over The Mountain~ and ~Snow Globe Scenes~ stamps sets to make these. After stamping the scenes I masked off the mountains and ink blended the skies. I tried to make each one look as if it were at a different time of day. I also tried to make the one on the far right look like the Aurora Borealis. I am not crazy about how it turned out but I am inspired enough to want to give it another try. Once the skies were done I went to work colouring in all the images with Copic Markers. I used a Wow embossing pen and some snow embossing powder to add some snow to the mountain caps and snow drifts. I added some sentiments, ribbon, twine and bells and I was done! 

I hope you enjoyed my tags and thank you for stopping by.

Natasha☺

Wednesday, November 13, 2019

25 Days of Christmas tags - Day 10

Hello and welcome!

Today is Day 10 of my lovely and amazing friend Tracey McNeely's 25 days of Christmas tags event. I cannot believe it's been on for 9 years!! I am so honoured that she has asked me to join her these past few years. She really is the QUEEN of Christmas tags. 

Today's sponsor is Simon Says Stamp so I made my tags with some of their great line of products. To give you an idea of just how excited I am, I made two tags for today. 😊 So without further delay...I  will show you the tags already! πŸ˜‚

My first tag:
For this first tag I used two dies. The -Christmas token die- and the -Maryanne snowflake-. I cut the Christmas token out of blue glitter cardstock 4 times. This die has a big snowflake in the centre that I didn't want to use so I used a circle die to cut it out. I wanted just the words as a frame where I could suspend the smaller snowflake inside. Once I had just the frame I glued them together.  I cut the smaller snowflake out of silver glitter cardstock 4 times.  I glued a piece of silver thread in between  the layers so I could attach it to the frame I created. Once this was attached, all that was left to do was attach a loop for hanging. I added some bells and a red bow for a pop of colour.  Easy...Peasy!

My second tag:

For this tag I stamped the image from the -Winter Hugs- stamp set onto a plain white ornament tag that I die cut from Neenah white cardstock. I masked the image off and ink blended the background sky. I used some Studio calico shine spray to make the snow drops. I coloured the image in with copic markers and used a Spectrum Noir shimmer pen to add some shimmer to the image. I used a WOW! embossing pen to add some puffy embossing powder to the hat. I heat embossed the sentiment onto black cardstock and attached it with foam tape.  To finish it off I attached a white silk ribbon for hanging.  

Phew! I think that took longer to explain than to make. 😝

Now...  wouldn't you love to win one of the awesome prizes that have been so generously provided by the AMAZING sponsors? If you would then hop on over to  Tracey's blog for all the details on how you can get init...to winit!

Well that's it from me for today. Happy hopping!
Tasha ☺

Monday, October 21, 2019

Thanks a TON

Hello crafty people.πŸ‘‹
Today I have a card to share that I not only LOVED making, but LOVE how it turned out.  If you know me, you know just how rare that is. Actually.... This one came out better that I had pictured it in my head. 😍What do you think?


To make this I used the -Ella and Edward the Elephants stamp set- from Technique Tuesday as well as masking and distress inks. 
I started by creating my masks. I stamped the elephant onto some masking paper and cut it out VERY carefully. I needed to use the negative space to create the silhouette of the elephant with ink blending.
Next I covered a 4.25 X 5.5 card panel with masking tape and die cut the circle. I used another piece of masking tape to sketch out the ground that the elephant was going to be standing on. 
When I was done. I went to work blending....and blending....and blending! 😝I used the stamp to place the elephant where I wanted it, but I realized after that that was probably not necessary. (If you look closely you can see the stamp lines)  When I was done with all the blending I die cut the panel with a stitched die frame and heat embossed a sentiment onto the bottom. As a final touch I added some spectrum noir shimmer to the sun and WOW! does it look amazing in real life. 

Thats all from me folks.. I hope you enjoyed my card for today. I'll be back with more elephant cards to share in the coming days so stay tuned.
Have a great day.
Tasha ☺

Friday, June 28, 2019

{Technique Tuesday} Beautiful Butterflies


Hi there. 😁Today I have a butterfly card to share. I LOVE butterflies. I love how these look like they are flying off the card. To make this I used the Beautiful Butterflies Silhouette stamps and matching dies.  

I learned how to make this card a few years ago from THIS tutorial Amber from Damask Love did. I used this same technique to make this card. Once I partially die cut my butterfly I used the WOW! trio in Confetti to heat emboss the butterflies. Don't you just love these powders with the speckles of silver and white? πŸ’“Next I used a black pen to make the boarder. I heat embossed the sentiment onto the card with WOW! Platinum embossing powder. I added some raindrops in various sizes to the butterflies and card to finish it off.

I hope you enjoyed todays card.
Thanks for visiting.
Tasha☺

Thursday, June 27, 2019

{Technique Tuesday} Thank you Big time

Hello, Hello. I'm back today with jiggling hippo card. This cute hippo is from this months Animal house set. Helen and Harry the hippos. 


To make this card I first created the background with some blue distress ink and a cloud stencil. I die cut this piece with a wonky stitched die. Next I stamped the images onto white card stock and cut them out with the matching dies. After I coloured everything in I die cut some grass and assembled all the images where I wanted them to go. I attached the hippo with a mini wobbler and then glued everything together. I heat embossed the sentiment onto a black piece of cardstock with white embossing powder and attached it to the bottom. I attached this panel onto a card base that I embossed with a diagonal embossing plate.

Thanks for stopping by.
Tasha ☺

Sunday, June 23, 2019

{Technique Tuesday} WOW! Embossing powder blog hop


Hello and welcome to day two of the Technique Tuesday and WOW Embossing Powder blog hop. You will LOVE the project ideas and inspiration you'll find along the hop. Plus no blog hop would be complete without PRIZES. And a SPECIAL OFFER too. I hope you "hop" right in and celebrate with us today!

Now let's get started.... shall we?

I LOVE heat embossing and I LOVE WOW! embossing powders.  I love how quickly and smoothly they melt. (Like Buttah! I tell ya! Like Buttah! 😝)
So when I was trying to come up with something to make for this hop I knew I wanted to use as much WOW! powder as possible! πŸ˜‚And I think I accomplished my mission.  At minimum this is a record for me in how many different colours of EP I've used on one card before. 

To make this card I started by stamping all the popsicle images onto a plain white card base with Versafine clear and Versamark black ink. I then heat embossed the images with clear powder. Next I used a WOW! embossing pen to colour in all the little sections and heat embossed each of them with a different colour powder. This took a bit of time but was quite satisfying. Once I was done "colouring" in all my popsicles with embossing powder I used a scalloped frame to die cut the panel out. When that was done I used my Versamark pad and inked up the entire panel so I could use the clear holographic glitter powder over the whole panel.  I mean, cummon..... That sparkle all over just kicks this up a whole lotta notches. Am I right?😍I mean this thing is soooo shiny it makes me happy just looking at it. 😁For the sentiment I die cut the label from black card stock. I also die cut the word "sweet" from the same black and I cut the word matt from white card stock. Once I glued the two pieces together I coved it with a layer of clear embossing powder just to add some shine and dimension. I used the bright white EP for the "You are" and then glued the word below that. All that was left was to assemble may card and call it DONE! 


Phew? I think it look me longer to explain how I made this card than it did to make it. (Just kidding!)
I hope you liked my card for today but before you move on...

PRIZES :
No Blog hop is complete without a prize!
WOW! Embossing Powders has 6 powders of your choosing along with a WOW carry case to store your powders safely in.
Technique Tuesday is giving away 2 x $20 gift certificate to their store
The Winners will be chosen at random from the comments left on ALL THE POSTS on both days. We encourage you to leave comments on both days the more comments you leave the more chances you have to win these fabulous prizes.
SPECIAL OFFER:
· Buy $25 of product in our Stamps and Dies for Summer category and get the Brave Wings stamp set for FREE!

· To receive your free stamp use the coupon code: FreeWings
· The coupon code is valid June 22th, through 24th, at midnight.
· Here is the link to the Stamps and Dies for Summer category: https://www.techniquetuesday.com/stamps-and-dies-for-summer.html

Monday, May 13, 2019

{Technique Tuesday} See you later Alligator

Hello and welcome to Technique Tuesday's May release blog hop. The Design Team are featuring a variety of products that have been released this month. Head on over to the Technique Tuesday Blog to see the full collection and links to all the amazing products that are now available to purchase. 

You should have arrived here from Jung Ahang's blog.

My card today uses the new Animal house stamp set called Alligators and Crocodiles


To create this card I first masked of the outer edges of a 4.25 X 5.5 piece of card stock with some post it tape.  I created a little sand mound by just free hand cutting it out using some masking tape. I then stamped my images where I wanted them to be and masked them with some masks I cut out of post it notes. 


Next I ink blended the background with some Distress ink in tumbled glass and antique linen. Once that was done I removed the masks and coloured my images in using copic markers. I used dots of colour to create some texture. I wasn't happy with the inked background and decided to create some texture to the water and sand by colouring over the ink with copic markers in varying shades of blues and browns. 


Once everything was coloured in I removed the masking tape from the border. I trimmed the piece of card stock down to 4 X 5.25 and adhered it to my card base with some foam tape to add some dimension. 

Next up on the hop is Dana Kirby.


Thanks for stopping by. I hope you found a little inspiration that will help you create some fun cards to share with Family and Friends. 😊

Tasha☺


Related Posts Plugin for WordPress, Blogger...