Friday, December 2, 2016

Advent Calendar Extravaganza with Taheerah Atchia

Hello everyone! Today I am super excited to be participating in Taheerah Atchia's Advent Calendar Extravaganza!  I was thrilled so flattered when Taheerah asked if I would be interested in participating.  


Advent Calendar Extravaganza is -the- festive event of the season! This ‘hop with a twist’ was dreamed up by Taheerah Atchia and features surprise destinations each day! Joining in the fun with Taheerah are ONE HUNDRED special guests - each serving up some fantastic Christmas inspiration! Just like an Advent Calendar, you’ll never know where you’re going to be visiting next until you ‘open the door’!

And that’s not all! With 25 *amazing* sponsors taking part as guests as well, your crafty wish list is bound to get a boost with a chance to win a prize EVERY SINGLE DAY!!

Join in the fun every day at taheerah-atchia.com to see what special surprises await behind the door!

Here's todays card:

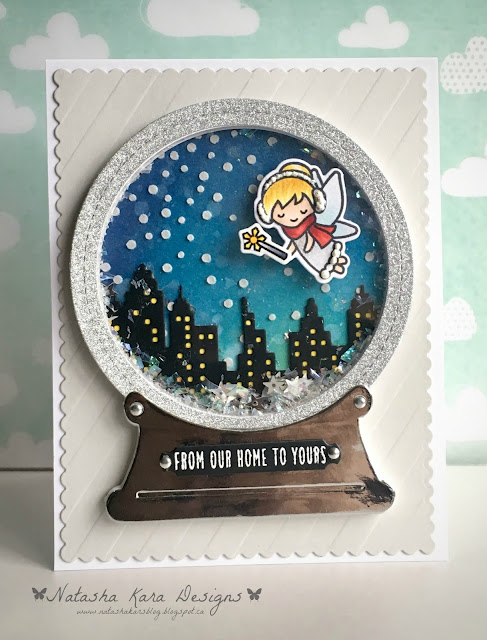
 For todays card I started with the snow globe from PTI. After cutting the base piece out of plain white card stock I went to work inking it up with a variety of distress ink colours. I then added some water droplets to give it some interest but decided I wanted some more texture, so I used a memory box stencil and some texture paste to create the snow. Once that was done I cut the Mama Elephant buildings out of black card stock and glued it onto a yellow base so to create "lights". For the front of the globe I used a combination of silver foil and silver glitter card stock.  I sandwiched the front and back together with double sided foam in between and added some chunky glitter, stars and micro beads to create the shaker element. The sentiment is from the WPlus 9  Heartfelt Holiday set, and is heat embossed with white EP on black card stock.  I always like to add little details that I think will add a little extra something to my cards and so I added some nail heads to the sentiment strip as well as the sides of the base of the snowglobe. 
The little fairy is from the Lawn Fawn "Frosty Fairy Friends" set. I coloured her in with copics and a glitter gel pen. I'm not sure if you can see it or not, but the bottom of her skirt and her ear muffs are puffy. I used a liquid appliqué pen and then used my heat gun to make it puff up.  I thought it was a fun touch. 
Once I was done with the snow globe I used a stripped embossing plate from PTI,  some soft stone card stock and a scalloped die to create the matt that I mounted the snow globe onto. I attached it all to a plain white card base and that finished my card for today. 
It’s not a party without a prize - and with prizes every day there are several chances to win! Today’s prize is generously supplied by Lawn Fawn so you’ll definitely want to win! Simply leave a comment on this post - then head back to taheerah-atchia.com and leave a comment there too! You must leave a comment on Taheerah’s blog as well as mine in order to be eligible to win! Don’t forget to grab the other surprise destinations from Taheerah’s blog and head over to them to leave comments there as well to improve your odds even more! You have until 23:59 EST on 31st December 2016 to enter.

Thank you for stopping by.  I hope you enjoy the other stops on todays post. :) 


Don’t forget Advent Calendar Extravaganza runs from 1st-25th December inclusive so make sure you visit taheerah-atchia.com every day for fabulous inspiration and amazing prizes every single time! Merry Christmas!

Wednesday, November 16, 2016

25 Days of Christmas tags day 16


Hello and welcome. Today I am excited to be playing along with the Muse: ChristmasVisions team, who are so excited to be sponsoring day 16 of Tracey McNeely's The 25 Days of Christmas Tags. 
Our theme is vellum - to qualify this week, your project must be a tag and it must include vellum. 
I personally love vellum. I don't use it nearly enough so this challenge was tons of fun.
I have 3 tags for you, I hope you enjoy them :)
For this first one, I wanted it to resemble a church window. I absolutely ADORE stained glass windows so this set is one of my favourites! :) I used an image from the PTI Stained Glass stamp set. I stamped and heat embossed the image with black EP onto a piece of vellum. I then coloured the image in using comic markers. Next I die cut the largest tag from the Lil' Inkers, Anytime Tags, die set twice out of white woodgrain card stock from Simon Says Stamp. One for the front and one for the back. I then used the co-ordinating die for the stained glass image and cut windows in both sides of the tag. I sandwiched the velum in between the two layers and adhered them together. I cut the frame out of gold foil card stock and added frames to both the front and back so the tag would look finished. Next I die cut the word Peace from PTI's wet paint die set three times with Smokey grey card stock and adhered them together. I added some shimmer with my wink of Stella brush pen before attaching it to the front of the tag. To finish this off I added some rain stones, some ribbon and some bells for an extra kick.

My Next tag is a variation of the first but I decided to simplify it:
The technique was exactly the same as the one above. For this tag I used the PTI tag sale #5 die. I used a gold wow embossing powder. I added a sentiment strip that was also heat embossed with the same gold powder. To finish this one off, I added some nail heads and a simple gold elastic cord.

And now for my third and final tag:
I used the PTI tag sale #3 die and cut two tags, one from some PTI printed vellum and one from some Birch Wood Veneer paper from Simon Says Stamp. The wreath and timings are from the WPlus 9 Woodland Wreaths stamp set and dies. Once I cut and stamped all the images I adhered them all together and then attached the wreath to the vellum tag. The banner die cut and sentiment are both from PTI's make it market Tinsel and Tags kit. The sentiment was heat embossed onto the strip of vellum using Zing EP in chocolate. I wanted to help the sentiment strip stand out so I used a light gold jellyroll pen to outline the strip. It really made a big difference. I tied the two tags together with just a simple gold mesh ribbon.
And there you have it :) 

But before you move on, remember that there are prizes to be won both at The 25 Days and at MCV - please check out the blog posts Here, and Here, for more details.
And last but not least, a BIG thank you to all the awesome sponsors:)


I hope you find some time to play along. Thank you for visiting me.
Natasha :)


Monday, November 7, 2016

A birthday card for Tracey.

Hello there.

Today I have a card that I hope will be a cure for the Monday morning blues.  It is a card I made for my good friend Tracey who recently celebrated a birthday. When I make cards for friends and family I always feel a great deal of pressure, since I, 1) want them to love it,  2) feel like it has to fit their personality and 3) feel it needs to be perfectly executed.  If you are lucky enough to know Tracey, you know just what a kind, sweet and caring person she is. I wanted my card to her to be bright and happy.  I wanted it to make her smile.


To make this card I started by die cutting and stamping the colourful flowers using MFT's modern blooms. I used a white gel pen to add some details to the flowers to make them pop a little more. Next I die cut the PTI layered banner using white for the top and silver glitter paper for the bottom. I adhered them together and added the "HAPPY" word die which is also from PTI. I went to work arranging the flowers around the banner and adhered it all to a grey scalloped panel that is die cut using a die from MFT's Blueprints 27. I popped this up onto a plain white card base with foam tape and added some rain drops to finish the card off. 
I hope you enjoyed visiting me today, and I hope to be back with more to share soon. 

Thank you for stopping by. Have a great day! 
Tasha :) 

Sunday, November 6, 2016

25 days of Christmas


Hello and welcome to day 6 of the 25 Days of Christmas tags event organized by the lovely Tracey McNeely.  I am so excited to be taking part once again in this fun event. Without further ado I give you my tag:


For this tag, I started by die cutting one of the tags from the MFT blueprints 2 die set using soft stone card stock. I used the Essentials by Ellen Stitches cover plate die for the background piece using white card stock. The word die is a Memory box die that was cut with black card stock and layered to create dimension.  The poinsettia flowers are also from Memory box using red card stock. After cutting all the elements and adhering them together I added a small drop of gold stickies to the renters of the flowers to finish it off.

Now for the fun part..... You get to play along too and possibly win some cool prizes from one of these awesome sponsors.

To find out how you can participate and/or enter to win, please head on over to Tracey's blog and she will have all the info you need.
Well, that's it from me for today. Thank you for stopping by and I do hope I have inspired you to play along with us.

Natasha :)

Monday, February 29, 2016

Muse Challenge #155

Hello!


Today I am very excited to be the Muse over on the Muse card club blog. When my sweet friend Ardyth asked me if I would be this weeks muse I was quite honored. :) Now I really do not want to disappoint so I went through a bunch of ideas stressing over whether it would be "musy" enough ( yeah I totally made up that word, but it works, no?) :D  In the end I decided to go with this sweet card.


Now, I have to admit that it was a two for in the sense that I needed a Birthday card for a party my youngest son was attending and I had not yet used this cute Elephant set from MFT.

My vision for this card was that I wanted the Elie to be carried away by 'tons'  balloons. I mean which kid does NOT love balloons? If any of my kids had enough balloons to carry away an elephant? Well, lets just say...they would be VERY happy!

So I started with (a LOT of ) masking and stamping the balloons. Once they were stamped I got to coloring them in with some copic markers. I then had to add some wink of stella to step them up a notch.  The Elephant was stamped onto a die cut and colored with copics too. The background was sponged with distress inks in limeade ice and mowed lawn on the bottom and tumbled glass and salty ocean on the top. the flowers were paper pieced since I did not think about adding them until after I had sponged the grass :/  I pierced tiny holes at the bottom of the balloons and threaded some embroidery floss through them was then attached to the elephant, who was adhered to the panel with foam tape. I attached this card panel to a scalloped frame that was cut from stone grey card stock which was then popped up onto an A2 white card base.

Once I finished this card I felt the need to do something with the inside and so this happened...


Now you would think that I would be happy to just STOP here and move on..... but you would be wrong!  You see, for those of you that don't know me. I am a go BIG or go HOME kinda gal.
So of course when it came time to wrap the gift I decided to make the wrapping paper to match the card. Which lead to this...


I absolutely LOVED making this card as well as the wrapping. I have to admit, I always claim to not be one of those card makers who make "cute" cards, and I envy those who do, but this one is pretty darn cute in my book and I am soooo in love with these elephants don't be surprised if you see more of them from me in the future :)

Anyhooo, I have kept you long enough. I do hope that I have provided you with enough inspiration to want to participate in this weeks challenge. I can't wait to see what you all come up with.

Have a great day and happy crafting
Tasha :))
Related Posts Plugin for WordPress, Blogger...